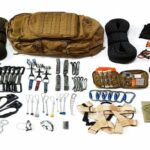
Gym indoor rock climbing for beginners often provides both rope climbing and bouldering. Bouldering is just climbing on much shorter walls with denser crash pads below, and it requires only shoes and no harness; you can do it completely solo, so you should try it out when you first come. It can help you get a feel for the handholds and how, if you trust your toes, they can truly grab the holds.
Check this out as well to kick start climbing.
The Equipment
When you first begin climbing, you’ll rent a harness and shoes. A chalk bag is also available. Most harnesses are the same across the board. There’ll be a waist loop and two leg loops, and you stand in the leg loops as you’re putting on trousers. The strap will then be tightened around your waist.
There will also be a loop on the front of the harness where the belay will be attached, so make sure you put the harness on with the loop in front. The harness should be worn about above the hips. It takes some getting used to, and it does feel like you’re wearing a diaper at first, but you’ll be walking about normally in no time and forgetting you’re even wearing it.
The sensation of slipping into climbing shoes for the first time is maybe stranger than the sensation of wearing a harness. They’ll feel like they’re a half size or so too small. They are designed to be snug; the concept is that the fewer shoes you have on your feet, the more you will be able to feel the wall as you climb, resulting in a greater grip on the holds. According to Ashmont, they should be somewhat unpleasant but not excruciating.
Climbing shoes are often worn without socks, which, in my opinion, is a bit unsettling if you’re renting from a gym. (How many feet have been in those shoes and sweated in them? (Shudder.) Fortunately, it’s perfectly ok to wear socks with climbing shoes when you’re just starting.
Once you’re doing more advanced climbs with tinier footholds, the foot-to-shoe contact becomes much more important, so you’ll want to forgo socks, although at that time you might simply invest in your shoes anyway. Many people inquire whether they can just wear their sneakers, and the answer is no, not really. Climbing shoes make a difference, so if you want to improve your chances of making it up the wall, rent them.
And a word about chalk: it should be your best buddy. Its goal is to eliminate moisture from your hands, and it may actually help you grasp the handholds. Many people underuse it, but you may also overuse it, so aim for a little film of white on your hand as you climb.
The Rope System
Ropes need their section since you must trust them to climb comfortably. And, to be honest, it takes some time to trust the system. But after you’ve done it, stepping up on the wall is a million times less terrifying.
Bouldering
Bouldering, as previously stated, is when you climb up and around a rock wall without the use of a rope. There are crash cushions beneath you, and you’re usually not traveling very fast. However, if you wish to top rope (climb high while utilizing a system of ropes to keep you from falling), you must be belayed.
When you’re belayed, it simply means that they’re on the ground while you climb, and the rope tied to your harness runs through an anchor on the wall and clips onto the belayer’s harness. The belayer’s task is to pick up (and also release) slack in the rope so that the climber falls only a short distance. These rope systems are designed to provide enough friction so the climber is safe even if the belayer isn’t performing a flawless job.
Once the belayer and climber are safely hooked in and have verified each other’s work, climbing instructors recommend walking up the wall for a few feet and then letting go to get a feel for how the rope can hold you. Doing this a few times will give you a better understanding of how the system operates and will make it easier to trust it. I strongly advise you to do so. Every time I go to the gym before my first climb, I do it only to remind myself of how it feels to “fall.”
When you initially start out, another alternative is to utilize an auto-belay. An auto-belay is a device that is attached to the top of the wall and picks up slack as you climb. When you’re ready, the gadget captures you and lowers you slowly—no need for a second person.
It’s an excellent way to concentrate on climbing without thinking about whether or not the belayer is performing their job correctly. You should also practice falling with the auto-belay to gain a feel for it. Unlike when you are belayed by a human, the auto-belay works like a seat belt: it appears that the rope will not catch you at first, but when you press your weight into it, it tightens up and stops you from falling.
The Instructions
Climbers and belayers have their own language—basically a series of calls and answers to ensure that all safety precautions have been taken before a climb begins—and it’s secretly one of my favorite aspects of climbing. The directives just seem so formal (particularly when said with vigor), which feels out of place in such a relaxed context… and it always makes me laugh. They do, however, serve a crucial role!
Communication is essential. I enjoy emphasizing it, “Knowing what the other person is going to do acts as a safety net to guarantee that everyone has a good time and nothing goes wrong.” Many mishaps occur due to a lack of communication.
Gyms may be noisy, and there may be other climbers right next to you, so strong communication and planning with your partner are essential before anybody gets off the ground. Climbing commands are quite common across all rock gyms, so you’ll almost certainly hear (and be taught in any beginner class) the following exchange before the climb begins:
- “On belay?” asked the climber. — The climber wants the belayer to confirm that they are connected to the belay system correctly.
- “Belay on,” says the belayer. — Before doing this, the belayer will double-check the carabiner to ensure it is securely fastened.
- “Climbing,” the climber says.–This indicates that the climber is about to begin ascending.
- “Climb on!” says the belayer. — This is the belayer verifying that the climber is ready to begin.
- “Slack!” says the climber. — The climber needs an additional rope to maneuver comfortably.
- “Up rope!” says the climber. — There is additional slack in the rope, and the climber requests that the belayer take it in so that the rope is taught.
- “Take!” says the climber. — When the climber is ready to be lowered off the wall, the belayer should bear the climber’s weight on the rope.
This isn’t a full list of climbing commands, but many of the others are better for climbing outside and won’t be useful in the gym.
The Procedure
One of the best things about climbing is that, unlike other sports or hobbies, you don’t have to truly master a movement pattern before you can do it; you look at a wall with some handholds, and your body simply knows what you need to do to get to the top. If you’ve ever climbed anything, you’ll be familiar with the fundamental motion.
Most individuals, on the other hand, need to be reminded to use their legs. A lot of people assume climbing is all in the arms, but I would argue it’s all in the feet. Instead of focusing on your hands and planning your next move around them, he proposes focusing on your feet and imagining how to walk yourself up the wall. That way, instead of doing pull-up after pull-up, you’re working your leg muscles, which will make climbing much simpler.
When you complete an introductory session with an instructor, you’ll learn some extremely beneficial form recommendations and be able to feel what they feel like in real life. Some things to remember, he says: “Keeping your hips over your feet as much as possible is important.” Keeping your center of gravity in the center of your body and close to the wall can help you stay powerful and in control of your motions. Keep your arms as straight as possible when you’re not using them to avoid straining your forearms.
When it comes to forearm tiredness, it’s unavoidable. People who climb for the first time or two frequently end up sore, with body regions aching that they have never utilized before. The fact is that, unless you participate in another sport that involves a lot of grip and forearm strength, your body isn’t used to using these muscles in this way.
Your fingers, hands, and forearms will rapidly get fatigued. What I’ve found is that I have to stop climbing before my legs and back get fatigued because my hands and forearms have reached their limit. That’s quite normal, and you that you’ll see improvements week after week. If you want to see some fast development during the first couple of months, climbing twice a week is great.
However, even climbing once a week will improve your form, endurance, and strength. And the finest part is after your first session or two of learning how to climb securely, it’s a sport you can pursue entirely on your terms. You don’t have to rely on gym employees for the rest of the procedure.
So you can go with a friend, or you can go alone and sign up to be matched with a partner at the gym (many climbing gyms have a belay-partner sign-up sheet), and you can get straight in the harness and up on the wall. Before you know it, you’ll be overthinking (read: fretting over) everything and feeling as comfortable in the climbing gym as an experienced pro.
Conclusion
There are just two things you should remember before your first climb, and they’re both quite useful. One: Dress in clothes that allow you to move freely. You’ll be stretching your limbs in all directions, something you can’t do in pants. Two, make sure your nails are properly clipped.
You don’t need incredibly short nails to climb, but as someone with longer nails, I’ve found that having them cut down makes it easier to hold with my fingers and also helps me not worry about unintentionally tearing off a complete nail. Climbing is also a terrific way to destroy a manicure, so don’t go shortly after getting one.


