Have you climbed a few times, and do you want to take it to the next level now that you’ve got some experience under your belt? In such a case, you are going to need to learn how to belay rock climbing. When top-rope climbing, either inside or outside of a climbing gym, belaying is an essential aspect of the activity. Continue reading to get things started.
Here are the top 10 rock climbing websites for you!!!
What Exactly Is The Meaning Of Belaying?
If you’re new to climbing, belaying can be something you’ve never done before, and that’s totally fine! Although the term “belaying” may refer to a number of different climbing techniques, in its most basic form, belaying is the act of applying tension to a climbing rope in order to provide a counterweight for a climber who has fallen. As the climber progresses upward, the person who is holding the belay rope, also known as the belayer, will draw the rope through a belay mechanism. When the climber slips and falls as a result, they won’t travel very far.
The belay device is intended to provide sufficient tension in the line so that the climber may be held by the belayer with a reasonable amount of ease. The belayer must constantly be ready to draw in slack, often known as “take,” in order to keep the climber in a secure position. The belayer is also in charge of making sure the climber gets safely back to the ground when they reach the top.
Even though it’s not a very challenging task, it’s certainly one of the most crucial ones. There is a legitimate reason why you have to pass the belay exam at each individual gym before you are allowed to use their belaying equipment. The phrase originates from a method used in maritime navigation, which entails fastening the rope to a spar or post.
In point of fact, it is a yell that sailors employ as a signal to one another that says “Stop!” when they’re on the water. Before we go any further, there is something really crucial that you need to know. If you want to belay other people in real life, you need to first take a class at the gym near your house.
These seminars are often considered beginner level and are offered at a reasonable cost. You may even bring a friend if you want to. However, this is the kind of strategy that you should learn from a seasoned teacher if you want to be successful. The goal of this article is to give you good background information and serve as a reference after you’ve taken a course on the subject.
Prepare Yourself To Belay
Harness:
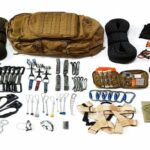
You must first ensure that you have the appropriate equipment before beginning the ascent. When top-rope climbing, the very first piece of equipment that you will require is a harness. Although you may rent a harness at the gym at any time, having your own personal harness is far more comfortable (and makes you look like a pro). Even though you have a lot of options for harnesses, you shouldn’t be concerned since we’ve got your back.
Carabiner:
Belay device requirements call for at least one locking carabiner in your collection of carabiners. It is always a good idea to keep a couple of them available in case you find yourself in a situation where you need to anchor in as well.
Belay Device:
As the last step, you are going to want to make sure that you have a belay device. There is an abundance of belay devices available on the market today, and they are all of high quality. The ATC and the GriGri are the two most common types of belay devices used when climbing.
The conventional ATC is manufactured by Black Diamond, but the vast majority of climbing businesses sell their own version for roughly $25. An ATC is a belay device that does not automatically lock itself. If you let go of the break line, the rope won’t catch, and the climber will fall to their death. Using an ATC to belay is likely to be both the least expensive and most common option.
On the other hand, GriGris are examples of a type of belay device known as a semi-auto locking belay mechanism. This indicates that the gadget will catch and maintain its grasp even if you let go of the break line. However, GriGris and other gadgets of a similar nature can cost more than a hundred dollars apiece.
When you are ready to commit to climbing as a long-term activity, you should start with an ATC since it is a great learning tool (and a vital component of a climber’s tool kit), and then move on to a GriGri when you are ready to take your climbing to the next level.
Setting Up To Belay
Let’s run over the procedures to get your belay system up and running.
Load Your Belay Device:
Be sure to set up your belay device properly by reading and following the directions provided by the manufacturer. This will differ significantly from one gadget to the next. When using an ATC, the most popular method involves taking a fold in the rope, which is sometimes referred to as a “bight,” and feeding it through the aperture at the top. After that, you will attach your locking carabiner to the ATC by passing it through the bight in the rope as well as the rubber base of the ATC, and finally, you will link it to your harness.
Anchor Yourself!
(This step is optional.) It is often advised that you anchor yourself if you are going to be belaying a climber who is heavier than you. At the gym’s many belay points, you can usually find sandbags or ground anchors that you can move around.
Lock Your Carabiners:
Whenever you use a carabiner to belay or anchor yourself, you should always make sure you screw to lock the gates of the carabiner.
Carry Out A Safety Check
Always make sure that you and your climber complete the last safety check to confirm that all of your gear is correctly secured.
Knots:
If you take a basic skills course, one of the knots you’ll learn to make is a traced figure 8 knot combined with a safety knot. These are the knots that the climber ties into the opposite end of the rope in order to secure themselves to the anchor. Be sure to check that they have knotted it correctly before using it!
Belaying Rope
Belay Device: Make sure that your belay device is loaded correctly, with the climber strand going up to the top of the wall and the break strand going to the bottom. If it isn’t, you need to check it out. In addition, check to see that your carabiners are latched.
Command Check:
The climber and the belayer’s ability to communicate with one another should be the final check that is performed before climbing. Both of them need to go over the words to make sure that everybody understands what they imply. Climbers have traditionally used the phrase “On Belay?” “Belay On.” “Climbing?” “Climb On! “But you shouldn’t let it prevent you from going out and having some fun with it! “Dude on a rock?” “Rock on, guy!”
Conclusion
To keep the climber from plunging to the ground, the belayer is primarily responsible for managing the rope for the climber and applying the appropriate amount of friction with the belay gear. Once more, novice climbers are strongly encouraged to enroll in a program taught by an experienced guide in order to acquire the correct belay technique. After you have acquired the necessary knowledge, you will be able to enter the climbing facility and begin your ascents.


