Today we’re tackling one of the most common climbing injuries: climber problems: the a2 pulley strain or tear. To school us on the topic we’ve recruited our friend and ladies climbing night regular Kristen DeStefano, who happens to be a super knowledgeable physical therapist and badass climber to boot. Read on for how to protect those hard-working and under-appreciated A2 pulleys.
Check out our exclusive interview with two friends, here!!!
The hand is easily the most commonly injured extremity for climbers, and I’m not just talking about those terrible skin tears you get from all that jug hauling. We ask a lot out of those tiny little bones. So, when you feel finger pain after taking a whipper while holding onto that tiny crimp, stop to consider what just happened before hiking back up to that crux. Chances are you’ve asked a bit too much of your A2 pulley. So, in today’s post, we’ll be covering the climber problems: the a2 pulley strain or tear, below.
Most importantly, What is a finger pulley?

If you’ve ever wondered what makes those fingers wiggle, it’s not tiny little muscles within each finger. Actually, there is a network of tendons, ligaments, and sheaths in each finger that help big muscles in your forearms do such precise work. The tendons on the palm side of your hand help you to make a fist. As they run-up to the tip of your fingers, they pass under sheaths that help to hold them in place. These sheaths are called pulleys because they help to improve the muscle’s mechanical advantage, producing a large enough force to hold onto that granite slab.
They also help to prevent bowstringing. Bowstringing would be when a tendon does not have these sheaths, causing the tendon to pull straight from end to end. It would be the equivalent of climbing an overhanging route and only clipping the first and last draw. Your rope would not stay flush to the wall. There are five finger pulleys on the palm side of your hand. They are numbered A1 to A5, A1 being closest to your palm and A5 at the tip of your finger. If you turn over that chalky palm of yours you’ll notice that your fingers, except your thumb, are divided into three segments.
The A2 pulley is located within that first segment and is regarded as the most important, and unfortunately, the most frequently injured pulley for climbers.

How did I injure it?
Since our middle and ring fingers are in the center of the hand they take the majority of the stress. The middle finger gets some help from the long index and ring fingers, but our poor little ring finger doesn’t get a whole lot of leverage and assistance from the tiny pinkie finger. This leaves the Ring Finger A2 Pulley as the most common pulley injury.
The example I provided earlier is likely the most common mechanism for injury. If there is one thing the human body most often does not like, it’s when a muscle or a tendon is asked to produce a lot of force and then a rapid stretch or movement in the opposite direction occurs. So if you’re holding onto a crimp for dear life and can’t find your next hold causing you to fall, that rapid and unexpected release can do your pulley in.
How do I know it’s injured?
The biggest telltale sign of injuring that pulley is if you hear or feel a pop followed by immediate pain while pulling down on a crimp.
There are three grades of sprains:
Grade I: involves a stretching or minor tearing to the tissue, but overall it’s primarily intact.
Grade II: involves a partial tear to the tissue, however part of the tissue is still intact
Grade III: involves a tissue that is fully torn, causing instability through the area.
With any grade, swelling will likely set in as well. Range of motion may be less with pain during movement. That first segment of your finger can also be tender to touch. If it’s a severe Grade II or a Grade III sprain, bowstringing may be noticeable.
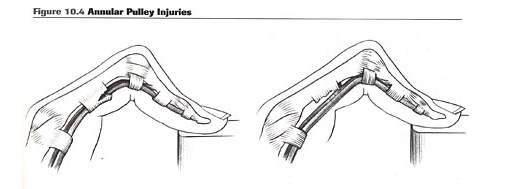
A2 pulley partial tear (left) versus complete tear (right).
What do I do if I think it’s injured and how is it diagnosed?
Regardless of your self-diagnosis, close your chalk bag, take off those climbing shoes, and find the nerdy physical therapist that secretly brings an instant ice pack to the crag. I know you were probably looking for that send, but continuing to climb may make the damage worse and keep you off the wall for even longer.
Once you’re home from the crag, it’s best to call a doctor. Seeing a medical practitioner or an orthopedist can help to diagnose if it is a pulley injury, the severity of the injury, and how to manage it to get you back to your project. A partial or complete tear can be identified through medical imaging such as an MRI or diagnostic ultrasound.
You may get referred to a Physical Therapist (PT), an Occupational Therapist (OT), or a Certified Hand Therapist (CHT, they are a PT or an OT with some extra special training). I promise we will do our best to get you to the crag ASAP.
Helpful List To The Climber Problems: The A2 Pulley Strain At Home
Helpful Things To Try at Home (After seeing that doctor… I’m holding you to it.)
- Rest. We need to give these injuries time to heal and scar over. Once you have a full range of motion again without pain, it’s important to start using it again.
- Ice. Right after the injury, ice helps to decrease blood flow (vasoconstriction) which in turn, decreases excessive swelling and inflammation. Ice for up to twenty minutes a couple of times a day.
- Massage. Deep friction massage (DFM) can help to reduce and break up unwanted scar tissue and reorganize healing tissue in line with the undamaged tissue, overall strengthening your pulley. Use your other hand to apply direct and FIRM pressure over the pulley and massage back and forth over it. It usually doesn’t feel great while you’re doing it, but can feel better a little after you stop. Perform this massage for up to five minutes. This should only be done after the initial inflammation stage has ended. If you find it irritating or causing excessive pain, hold off.
- Perform exercises. Totally calling it quits lets the tissue heal and scar as a naturally weaker tissue. Gently using and stressing the injured tissue allows for the healed tissues to get more blood flow and become stronger. Start slow and progress as tolerated. Begin with a range of motion exercises, opening and closing your hand through the pain-free range. This helps to bring blood flow to the area. As you start to feel better, Theraputty™, grip trainers, or using exercises with a rice bucket can help to perform some low threshold strengthening.
How Do I Prevent Pulley Injuries?
Athletes tend to succumb to injury when they are pushing themselves to their limit during every training session. A hand pulley is not directly connected to muscle, so having strong finger flexors doesn’t mean you’re totally in the clear. Adding a little variety to your training routine can help prevent pesky injuries that keep you off the wall.
- Know your limit. If you continually try to push beyond it, eventually you’ll have a setback.
- My favorite rule as a PT (and probably most disregarded by patients at some point or another)… If it hurts, don’t do it. Yea, yea… No pain, no gain. You wouldn’t be the first to give me that come back, but at the end of the day, pain is your body’s way to communicate something is wrong. So, listen to it.
- Warm-Up. I know you’re eager to flash that project of yours while your arms aren’t tired yet, but you need those tissues to have the proper blood supply to get their job done.
- Vary your climbing between different holds and different angles.
- Rest! If you’ve tried your project a couple of times give those hands time to regroup.
- Use Tape. If you’ve had pulley injuries before, research has been showing that H Taping is the preferred method to support A2, A3, and A4 pulleys.
- Keep those hands strong, incorporate days dedicated to strengthening your hands on those little holds (hangboards, forearm endurance training, grip strengthening, etc.)
I know we all want to climb bigger and better, but remember you need to be in good health to do so. Train properly and take care of injuries the right way to get back out to the crag as soon as you can in and in the best shape possible.
Stay healthy and climb on!
-Kristen
Kristen DeStefano, PT, DPT, graduated from Ithaca College with a B.S. in Clinical Health Studies and a Doctorate of Physical Therapy (DPT). She currently practices at an outpatient Orthopedic/Sports Medicine practice in Massachusetts.
Please contact us at [email protected] if you have any injuries that you’d like to see Kristen cover in future posts. Thanks, Kristen, for sharing your knowledge with us!


