Climber problems shoulder injury: Today our friend and favorite physical therapist Kristen DeStefano is back! Last time she gave us a lesson on the A2 pulley strain and now she’s filling us with knowledge on shoulder injuries. The shoulder is a complicated place, so get comfy and prepare to be schooled.
We ask a lot of our shoulders while climbing, so don’t forget to give a little back to them’.
The shoulder is a very tricky and complex joint. Injuries to this joint are not only extremely common but can be disabling to climbers, even during their daily routine. Research shows that 20% to 30% of the general population is affected by rotator cuff pathologies, which only become more prevalent and disabling with age. So, when those nagging shoulders are slowing you down at the crag, or you’re just trying to stay healthy, here are some helpful tips.
The shoulder and its attachment to the body are made up of three bones: the humerus, the scapula (more commonly known as the shoulder blade), and the clavicle (A.K.A the collar bone).
If you look at where the humerus meets the scapula, you will note that it is a ball and socket joint, allowing it to pivot in just about any direction. Additionally, the head of the humerus (the ball) is 3 to 4 times larger than the shallow socket it sits in. Due to this small amount of bone-on-bone contact, as well as the shape of the joint, the shoulder is the most mobile joint in the body. Unfortunately, the luxury of mobility has its downfall, as the shoulder is also innately a very unstable joint. If you are still struggling to picture this shape in your head, imagine a golf ball sitting on a tee.
The ball can roll on the tee in any direction it wants, but since the golf ball is so big compared to the small and shallow lip on the edge of the tee, it’s very easy for the ball to roll off. When it comes to the shoulder, we use other anatomical structures to counteract this instability and provide the support needed for sending routes. One of the most influential structures for added stability is known as the rotator cuff.
What is the Rotator Cuff?
The rotator cuff is a network of four muscles of the shoulder that surround the joint. These muscles are the supraspinatus, infraspinatus, teres minor, and subscapularis. (Don’t worry there is no quiz later.) These muscles, originating from the shoulder blade, send tendons that fuse together to attach to the head of the humerus, allowing for movement to occur. As larger muscles initiate movement of the shoulder, the small muscles of the rotator cuff work as a unit to pull the ball in to the socket and provide support around the edges of the socket (so the golf ball doesn’t fall off the tee).
Well, It Hurts! What’s Wrong?
Just when you thought you fully grasped the basic shoulder anatomy, the plot thickens. Take a closer look at the bones of the shoulder again, just above the joint itself. There, you will notice a piece of bone coming off the shoulder blade that sits just above the joint. This is called the acromion. The acromion is important as many muscles attach here to allow the shoulder to move, however, it can be very pesky for some. Ideally, we want this bone to be flat over the shoulder joint, however in some cases, it is curved or hooked.
The supraspinatus (one of those rotator cuff muscles) and the tendon of the biceps muscle run underneath the acromion. If you just happen to have a curved or hooked acromion, increased rubbing or friction can occur leading to pathologies such as tendinitis or tendinosis. To make matters worse, poor posture can tilt the shoulder blade, and therefore the acromion, forward closing down that narrow space and increasing the likelihood of this rubbing further. Over time, this problem can lead to:
Rotator Cuff Tendinitis/Tendinosis: Tendinitis refers to acute inflammation and irritation of the muscle-tendon. Micro tearing of the tendon can occur. Tendinosis is a more chronic problem resulting in a degeneration of the collagen that makes up the tendon and is frequently associated with overuse and repetitive movements. These problems are classically described as having sudden pain when reaching overhead, particularly at the very top of the movement or with lifting, a dull aching pain with activity or at rest, or radiating pain in the front of the shoulder to the side of the upper arm. As it worsens, the shoulder can feel stiff and weak and you can develop pain at night.
Rotator Cuff Tears: Uh-oh. One or more of these tendons can become partially or fully torn. Most commonly this occurs with the supraspinatus tendon. When this occurs, they are no longer fully attached to the humerus resulting in weakness with lifting or rotating the arm, significant pain raising or lowering the arm, and pain at rest or at night, especially when lying on the arm. These tears can occur acutely from falls and lifting something too heavy, or over time when the tendon chronically degenerates and wears down.
So, What Do I Do About It?
If you are currently experiencing pain, it is always best to seek a medical opinion for a proper diagnosis. Those who are diagnosed with rotator cuff dysfunction may be sent to Physical Therapy (PT) for treatment, in some cases given cortisone injections to reduce inflammation or undergo surgery in severe cases such as cuff tears to repair the torn muscle. Rotator cuff pathology is easily seen by imaging on MRI, which can help to determine the extent of the problem.
For those with minor aches and pain, or those trying to get ahead of these possible problems, exercises can be performed to both improve the positioning/posture of the shoulder and strengthen for added support.
1. Flexibility:
Flexibility is an important piece to the puzzle, as there is little meaning to strengthening and supporting the shoulder joint if it is in the wrong posture, to begin with. Unfortunately, many activities in our daily life such as sitting at a desk for work or sitting on the couch, coupled with the pesky forces of gravity, cause our shoulders and our head to wilt forward. As our head shifts forward, either due to the weight of gravity or to get closer to that computer screen, our shoulders begin to droop and our backs will slump.
Over time, certain muscles that are now resting in a shortened position will become tight. Below are a couple of stretches that can be helpful to combat this problem.
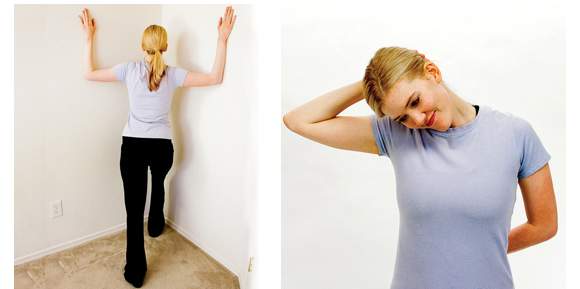
Corner Pectoralis Stretch (left) and Levator Scapulae Stretch (right)
2. Corner Pectoralis Stretch:
Stand facing the corner of a wall with your feet staggered. Place each forearm on the wall so your elbows are bent and your upper arm is parallel to the floor. Lunge onto your forward foot pushing your chest closer to the corner of the wall. A moderate stretch should be felt in the front of the chest and shoulder. Hold 30 seconds and repeated 3 times.
3. Levator Scapulae Stretch:
Place the arm of your affected side behind your back. With your other hand reach over your head and draw your head so it bends and turns away from the affected arm (you will be looking at your opposite hip.) A moderate stretch should be felt on the backside of your neck just above your shoulder blade. Hold 30 seconds and repeated 3 times.
4. Strengthening:
If you are trying to strengthen the muscles of the rotator cuff, there are key exercises that will help. However, if you are also trying to improve the overall strength and health of your shoulder, you must look behind the rotator cuff itself. Strengthening the muscles of the upper back, those between the shoulder blade and spine will help to hold the shoulder down and back in a position that maximizes the space underneath the acromion. These muscles are commonly overlooked. These muscles include the rhomboids, the middle and lower trapezius, and the serratus anterior.
Shoulder Workouts
1. Prone “T”:
Lay face down with one arm off the each of a bed, or with your chest on a lifting bench or physioball. While keeping your arm elbow straight raise your arm (so that it becomes parallel to the floor) and draw your shoulder blade down and inward towards your spine. Your thumb should be facing upward.This exercise can also be done in “I” formation so your arm is along your torso, as well as “Y” formation which engages the lower trapezius muscle. The “Y” is the hardest position and can be irritating to an already angry shoulder.
Prone “T” exercise
These exercises should also be done with low weight as they are small and often weak muscles. The goal is not to raise the arm, but to squeeze the shoulder blade down and in. Using too much weight can cause an inability to isolate the proper scapular movement or lead to injury. These exercises can even be done with no hand weights to start.
2. Plank Push Up Plus:
Start in a push-up position on your hands and toes with your elbows locked. While holding this position, push your rib cage up towards the ceiling by a few inches, pulling your shoulder blades forward. Then, return to your original position. Your elbows maintain a locked position; a traditional push up is not performed. To make this move easier, it can be done on an incline.
Plank Push-Ups
3. Rows:
Sit or stand while holding onto the elastic band (or cable weight handles) with both hands at about elbow height. Pull back the band while you bend your elbows and squeeze your shoulder blades down and inward. Keep your elbows close to your body.
Rows
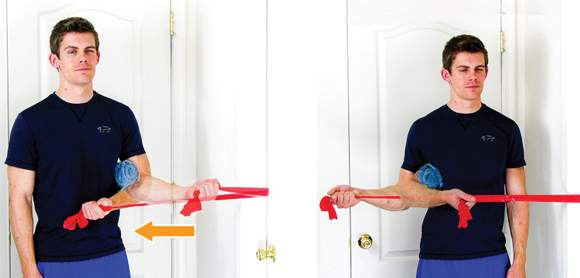
4. Shoulder Internal Rotation:
Stand with the elastic band at your side with your elbow bent. Starting with your hand away from your stomach, pull the band towards you and across your body. Your elbow should stay bent and at your side. Holding a rolled-up towel between your elbow and torso is a good way to prevent unwanted compensating movements.
Internal (left) and External (right) Shoulder Rotation
5. Shoulder External Rotation:
Stand with the elastic band at your side with your elbow bent. Starting with your hand near your stomach, pull the band across and away from your body. Your elbow should stay bent and at your side. Holding a rolled-up towel between your elbow and torso is a good way to prevent unwanted compensating movements.
Strengthening exercises can be performed for ten repetitions and up to three sets. It is recommended to start with a lighter load and increase gradually as you get stronger. Find a resistance where you feel fatigued at the end of the set but are still able to maintain proper form.
As always, listening to your body’s response to activities and exercise is the best way to prevent or further an injury. From there, staying strong and flexible will help increase joint health, minimize the likelihood of injury, and keep you at the crag.
Stay strong and climb on!
-Kristen
Kristen DeStefano, PT, DPT, graduated from Ithaca College with a B.S. in Clinical Health Studies and a Doctorate of Physical Therapy (DPT). She currently practices at Beantown Physio in West Roxbury, Massachusetts.
Please contact us at [email protected] if you have any injuries that you’d like to see Kristen cover in future posts. Thanks, Kristen, for sharing your knowledge with us!